Tuesday, December 05, 2006

AAR: SP74 - The Last Tiger

Doyle Motes

Dec. 2 saw Alan King and I square off in a battle of large tanks and Infantry (SP 74 The Last Tiger).


Alan was the Jackbooted Germans and I was the Red Dogs of War the Russians. Object was for the Russians get infantry and tanks inside a set area controlled by German infantry and the cream of the Panzer forces (a tiger, a Nashorn, and a SPW 251/22). Simple task you say -- I think NOT! The Russians have several tanks in there force form the IS-2, T34/85, ISU 152, and M4/76a - but will this be enough to meet and beat the Jackbooters. O yes the Germans have the height advantage and the Russian tanks must cross some open ground. The task is grave for the Russians and SPEED and Lady LUCK has to be on your side.


Russian's have to have there troopers as riders to be able to get enough infantry across the board to offset the Germans holding the high ground, woods, and town buildings. The Russians move out and quickly encounter the Nashorn on the hill and his fist shot miss no rate, but Alan decides to go for an IF shot. You guessed it the tank rolled to at stop dead. The rider breaks and then reduces to bailing out. But, the crew did escaped. The SPW 251/22 pick out a tank and shoots bing a hit but does not destroy it. He now shoots again due to rate and misses. The Russian tank is now protected by the woods. The other Russian tanks move into position to address the two German vehicles on the hill. Infantry moves up. The Advance Fire phase turn 1 - saw the Russian's shoot at the Nashorn from behind a stone wall --- Load --- Fire and hot metal rang out form the T34/85 and as the dice slowly stop it was 1,1 (Snakes Eyes) the song of death for the Nashorn. It erupted in a blaze of glory for the Russians and Alan's smile left his face. The next tank to shoot upon the hill was the ISU 152 (crew exposed) its target was the SPW 251/22. A TH 3 was need and a three was rolled. The shell left the tanks and hit the SPW 251/22 ht the to kill roll was a 12 (Dud). That tanks was able to escape and soon to slap the Russians again. The other 251/1 ht was hit by a M4/76a -- that ht was turned into a burning mass of metal. Turn 2 saw the Russians moving for position but the HIP Tiger as not to be found. The Germans now started hitting the infantry as they press for position. But, again the Germans roll a 12 with there MMG and a key position had to be surrendered to the boys from Moscow. Turn 3 was a turning point for the Germans they were able to break some Germans in a stone building and the flood was on for Stalins hoards. A T34-85 moves in for the kill on the SPW 252/22 only to be sighted by the --- He fired and missed the Russian had little choice but to move closer to the tiger (open ground and no cover). Alan's tiger decided to IF and belched another couple of hundred pounds of hot metal and misses again. The T34/85 decides to move between the SPW252/22 and the Tiger. But, before the Russians can even get off a shot the German's in a building decide to go for a PF. Yes, after facing the cold blooded Tiger the PF form a building does him in(he does not burn). Two more Russian tanks move into position to cross swords with the mighty beast. The new IS-2 move up on a hill over looking the SPW 251/22, Tiger, building full of infantry and leader. A T34-85 after moving and being CE fires on the Tiger (from hell) and BOOM it was now dead and the crew escapes. The other tank shoots at the units in the stone building and Snakes are rolled. German units break due to cannon fire. Infantry now move into position to be in the victory locations by end of game. Russians try to use a PSK to fire on the IS-2 on the hill and decided to eat the back-blast. They missed and broke due to back-blast. As turn 4 rolled around the Russians decided to shoot the Infantry in the house just below the IS-2 that had used the PSK on them. Load -- -Fire--- Boom again 1,1 belches from the 122L gun -- that group died in a blaze of glory of Iron Cross. At this point Alan decided the Germans had - had enough and surrendered.


This game was fast and deadly for both sides. I would rate it about 9 on ROAR. Play it you will like it.


Alan, I enjoyed it. As Jay Harms says it is better to be lucky than good. The number of snakes you and I rolled made for a deadly game.


Doyle Motes

Wednesday, November 29, 2006

AAR: J106 - Marders Not Martyrs

Zeb Doyle

Mmmmmmm, Thanksgiving weekend...it's tough to top food, family, and football. This year, I did manage to improve the holiday formula by ditching the family and heading to Eric's for football plus ASL. Now that's a combination that's impossible to beat. The football wasn't so exciting, with UT going down meekly to A&M, but the ASL more than made up for it. Inspired by the stellar AARs from Nick and Tom, we decided to try J106 Marders Not Martyrs from J7. The previous AARs did a great job covering the scenario, so I thought I'd try more analysis and less narration here.

We'll start the analysis with the VC, the heart of any scenario. The Russians win by exiting 17 total EVP, which must include at least 3 infantry EVP. Although they have 51 EVP in their force, the Russian ground-pounders have only 6 turns to go 15 hexes. This is a relatively rapid pace, especially given the open terrain, and it would take terrible German play or amazing luck to achieve anything close to 10 EVP with the infantry. Instead, the vast majority of playings will revolve around the exit of two KV tanks and a handful of squads. Clearly then, the KV tanks are the key to the game, both for their combat power in clearing a path for the infantry and for their EVP potential.

Since the Russian tanks are so vital, let's examine the AFVs of both sides. The German Marders are pure tank-killers due to the limited HE and lack of machine guns, while their weak armor and OT nature means that even the Russian light mortar is a threat. To make matters worse, the Marders aren't even very effective tank-killers here, as their net 6TK against the frontal KV armor puts the German on the wrong side of the bell curve. Although the possibility of APCR and the 2 ROF help, the German has to expect more Shocks and Immobilization than outright kills. Given this fragility and lack of punch, it's even more important than usual to avoid any situations where the KVs can gang up on an isolated Marder.

On the other side of the board, the Russian tanks have a few disadvantages of their own, such as the red MP numbers and the requirement to stay buttoned up to fire, but the 76mm MA auto-kill against the thin Marder armor outweighs those minor flaws. The KVs are also extremely durable; as we saw above, the Marders need a good roll to kill them and the German infantry has no hope other than CC to hurt them. In short, we can expect the KVs to dominate much of the action. Their major challenge in the scenario is that they must move to confront the Germans, thus giving the Marders the first shot. This is always a tricky proposition, especially since the Russian cannot afford to lose more than two tanks. As a final note, the KVs must be careful not to engage the Marders at extended range. We all know about the red vs black TH numbers, but here the small CE Marder with the 75L gun has a major edge over the large BU KV with the 76 gun. If the two forces simply parked on their respective hills at 16 hexes apart and shot it out, the Marders would start with an amazing 10TH vs the 5TH for the Russian.

Now that we've crunched all these numbers, let's step back and picture how the overall scenario might play out. The Germans, both with the infantry and the AFVs, have the advantage of ROF and range, so we can expect a defense in depth. The entire set-up will be intended to funnel the KVs onto the Marders, which will be safely towards the rear. The Russian light mortar is a concern here, but not enough of one to influence the Marders placement. Given the opening ranges, the MTR will need a 5TH and another 5 on the IFT to do anything, which isn't too deadly. To prevent acquisition and multiple fire phases of attacks, we'll set up the German HMG to duel with the MTR in an attempt to remove that threat early. Additionally, the HMG will be manned by a HS to make the defense less fragile and free up another scarce MMC for use elsewhere.

The Russians, meanwhile, would love to match up their infantry against the Marders and the KVs against the German infantry, but this is very unlikely to happen. So, the Soviet infantry will trade in the 8-0 for a commissar and push forward as best they can, with an eye towards CC and pot-shots at CE German AFV crews. Since the Marders armor is thin, even machine guns may be pressed into use as tank-killing tools. Meanwhile, the KVs will look to mass against a single Marder and fight at a range of two to six hexes. As we saw above, shoot-outs at seven or more hexes give the edge to the Marders, while the increased chance to hit at one hex is not worth the net TK change from 6 to 7.

With this hypothetical model scenario in our heads, let's now examine how Eric and I actually played it out. Both sides set up almost exactly as described above. The 50mm MTR got one shot at the Marders, missed, and (like everyone else in TX, apparently), was KIAd. The infantry of both sides then proceeded to clash in a profoundly non-decisive fashion. The key to the game came in the tank battle, when three KVs managed to isolate a single Marder at three to four hexes. The Marder Stunned two KVs but then was hit and flamed by the third. The remaining Marder maneuvered to clean up the Stunned KVs, but one of the Russian tanks unexpectedly came back to life and blasted the offending German into scrap. Although a brave landser destroyed the remaining Stunned KV, the loss of both Marders left three unopposed KVs. At that point, Eric and I pulled out our notebooks and wrote 'Game Over.' We played it out for posterity's sake, but the Russians triumphed with a turn to spare.

Anyway, analysis aside, it was a fun scenario that we managed to knock out in a lesurely three hours. Thanks again to Nick and Tom for bringing it to the attention of the list. I'd recommend it as well as a very fun 'lighter' scenario. Finally, if anyone has a strong preference for my analysis AARs over my narrative (or vice versa), I'd like to know.

Thanks for reading!

Zeb

Tuesday, November 07, 2006

AAR: SP34 Frankforce

At yesterday's game day Doyle Motes and I matched up in this scenario from Schwerpunkt. I wish I had brought my camera to take photos of the game in progress, but I forgot. So we'll just have to make do with description. The scenario is played out over the relatively open countryside boards 4 and 43. The British must exit 26 points through the German defenses. But they are not allowed to exit across the entire board edge, but rather through a range of hexes that are roughly in the middle of the board edge (hexes M through Y if memory serves). To do so they have 11 first line squads, 6 Matildas (marks I and II), and a MkVIC tankette. The tankette is very fast but also very lightly armored, whereas the Matildas are slow and reasonably heavily armored. They are further slowed by the lack of radios in the Matilda Is. Opposing them the Germans get 7 first line squads led by a 9-2, a 37L gun, and two 88L AA guns.

Since the British can enter along the entire north side of the map (board 4), the Germans must deploy their forces in such a way as to be ready for any angle of approach. However, the speed (or lack thereof) of the tanks means that the British cannot dawdle. In fact, the tanks probably have to remain in motion for most of the game to have a reasonable hope of exiting. It would be very unlikely for the British to get the needed 26 exit points without the majority of them coming from the tanks, so clearly the 88s are the centerpieces for the German defense. An SSR even allows the German to ignore one non-intensive-fire malfunction by one of the big guns, further underscoring their importance to the game.

From the German perspective, the map has the board 43 walled compound or village just to the right of center. The rest of their backfield is dominated by grain. I set up the 88s in a manner such that each covered one of the extreme ends of the exit area, but so that they also could cover the middle together, and lend some support to each other as well. The 37L I put on the extreme left flank looking back across the middle, hoping to surprise some tanks with a rear shot if Doyle came that way. Most of the infantry went into the village, with a couple of half squads as close to the exit area as they were legally allowed, with the aim of moving to the exit hexes immediately and digging in.

Doyle sent his British troops in a massed attack on my right flank, oriented toward and around the board 43 village. The very early game was fairly uneventful as my Germans tried to harass his infantry as they moved forward through the grain. Small results were achieved here and there, but no big deal. On the second turn I managed to get the 9-2 and MMG into position in the village to lay a nice fire lane across the British avenue of advance. I thought this would probably do a good job in slowing the British attack. However, one of his first few units to move outside the fire lane went berserk due to another shot, and started charging the MMG position. As soon as they entered the fire lane the MMG malfunctioned. This opened the floodgates and Doyle sent his troops pelting forward hard. As they got closer to the village to prepare an assault, most of the British tanks continued their slow platoon movement around the edge. The exception was the speedy MkVIC, which Doyle used to scout. He had a pretty good idea where my guns were and sent the tankette searching for them. Given the axis of the British attack, one of my 88s was in a key spot and the other was somewhat (but not entirely) out of position. My key 88 was in a brush field in front of a stone building guarding the right and center of the exit area. As it became obvious that Doyle was going to discover this gun and probably overrun it, I had to reveal the gun and spin it to take a shot at the tankette before it was too late. I decided to take the shot with the tankette two hexes away, so that there would be the opportunity for an intensive fire shot if I missed. The shot was true, however, and the pesky vehicle was set ablaze. Doyle seemed pretty content with this result, because the blaze would provide a bit of smoke cover. But really the more insidious effect was that the blaze could spread to the brush and eventually cook the German gun! And the blaze did spread very rapidly indeed. It spread, well, like wildfire.

Fortunately the showdown at the village took a turn in my favor as the German 9-2 leader directed an attack that broke several British and limited their fire opportunities. This looked like it would stall the attack quite well, except that Doyle countered with a critical hit from his light mortar, and effective machine gun fire from one of his tanks to break the 9-2 and a couple of squads. It took them a couple of turns to rally. In the meantime back at the gun position, nearby German half squads moved in to try to hinder the spread of the flames to keep them away from the gun, which had destroyed one of the Matildas that it could see to the right of the village. They could slow it down but they could not stave off the flames forever. Would the blaze cook the gun in time for the British to make good their escape? The fire was already providing some smoke cover. Ultimately they bought enough time for the 9-2 to rally and bring over a couple of squads to the gun position to keep the flames away just long enough. Toward the end Doyle kept wishing for a wind change to kick up more smoke to cover his exit, and dang it if he didn't get it, almost calling his shot on the wind change dice roll. Wow. Fortunately for me the direction of the wind was away from the gun, which made it a little harder on the fire to spread to the gun, and also rolled the smoke back toward the British tanks rather than on top of the gun. In a little bit of irony, the smoke cover Doyle wished for actually helped the German cause by making movement for the very slow tanks even more expensive, costing several of them their chance to exit in time. Some British infantry had pushed hard all the way down the flank to support the tanks, but on the last turn the Germans shifted some infantry over to occupy the exit hexes to prevent and British infantry from exiting. The other 88 actually ended the scenario with an unlikely hit on one of the last Matildas with a chance to exit.

Overall this scenario was a pretty fun experience with a few key events. The berserker helped the British forward somewhat, and the loss of the tankette burning in the brush had a huge impact. I don't think I've ever played a scenario where I've made so many attempts to hamper flames. And then of course calling for, and getting, a wind change was rather amazing. If I were the British player I think one thing that would bother me would be the need to keep the tanks moving nearly all the time, rather than fighting. As the German, I think there isn't a lot of mystery about where the big guns should go, and I don't often like feeling that constrained in my setup, although it certainly makes setup relatively easy and quick. It appears quite balanced on ROAR (23:22 Brit), and plays rather fast, so it's probably pretty good tourney fare.

Sunday, October 29, 2006

AAR - PEGASUS BRIDGE CAMPAIGN - Part III

Ed Beekman

Dawn, Sean Harris:British, Ed Beekman:Germans

As discussed earlier, I bought a Panzergrenadier Company and Platoon as well as a platoon of GSW 39H (f) self propelled artillery. The infantry reinforcements were full strength but Jabos must have hit the vehicles along the way because they arrived depleted. The infantry platoon received an 8-0 leader and a full complement of support weapons. The company received a 9-1, an 8-1 leader and all allotted support weapons except they had no HMG. The sole GSW 39H received a 9-1 armor leader, extremely useful for an open top vehicle. I also figured that I would need to spend the last CPP on FPP to create HIP and dummy stacks. Otherwise Sean would see only real units and every shot would put real squads at risk. I placed a HS HIP in the orchard next to the Town Hall overlooking the valley and a full squad HIP in the forest road hex into Le Port. I used ten concealment counters as dummy stacks.

My objective was to get my reinforcing infantry into the front line. The infantry platoon would move to the chateau, put the MMG and Lt Mortar in the Second Level and Roof to interdict movement along the river road. The rest of the platoon would move to reinforce the blocking force on the road into Benouville. The infantry company would move as fast as possible to get as many troops to reinforce the brittle garrison in Le Port. Sean’s main objective was to expand his bridgehead.

Maneuver dominated the early turns of the scenario. My reinforcements double timed towards their objectives, although I shifted three squads from the company to reinforce the east approaches to Benouville and another three to the north approach. Sean snuck paratroopers through the streams north and south of the bridge and formed up to assault along the west road to Le Port and towards the Town Hall. My units directly confronting the British continuously skulked out of LOS during my turns and whenever possible would remain there to regain concealment. The +1 dusk attack drm combined with stone building or wall covers made +3 or +4 attack modifiers common and there were even a few shots in the game with a +5 modifier. Of course I usually had 4, 6 or 8 FP attacks but Sean, on the other hand, usually had 12, 16 and once got as high as a 36 FP attack. The power of these attacks just wore away at my units and tested my ability to rally them back into the line.

When the shooting started it did not go well for the Germans. The first shots wounded and ELR’d my new 8-0 leader and casualty reduced and ELR’d one of my two elite squads. The GSW 39H found a good firing position in the behind the Town Hall so it could hit any Brits that tried to make a move on Le Port from the crossroads building cluster. Unfortunately it Malf’d its MA on the second shot and it was several turns before it finally repaired it.

The Town Hall/School House building cluster fell when a Conscript squad disrupted from a good shot from Sean and then later in the turn the only other squad broke due to sniper fire. Sean infiltrated a squad of paratroops and cleared the buildings before my troops could reinforce. The loss of these buildings was a boon for expanding Sean’s bridgehead and a blow to my containment efforts.

Around this time I found a collaborator in the local populace who revealed the location of a HIP British 6 pounder AT gun. The info was very useful, if my SPA had moved a little more to the north it would have come into its LOS with potentially dire consequences.

Sean kept shooting at the squads in the treeline shielding LePort but they held their ground. I even generated a hero on the west flank, who bought time to reinforce his position, at the cost of his own life, when his original squad broke and routed. The southern line would not be breeched although some Frenchman ratted out my HIP squad in the forest road.

The eastern approach to LePort was another story. Two groups of paratroops infiltrated up the stream, crawled up to the crest, drove back the defenders and charged into the tree line. The fighting was bitter and frequently turned to ugly melees. One German squad escaped by luck of ambush and withdrew to continue the fight. Some of my conscripts weren’t so lucky. One British team moved to clear the buildings to the river road while the other drove in towards the church with its steeple that gives the Germans a sniper bonus. The squad and leader clearing the way to the river road succeeded in its mission all the way to the last building at the river road intersection. Here defender and attacker alike met mutual destruction in melee. Only an abandoned French-made LMG scrounged from a Hotchkiss tank remains to show what happened there.

The other, more powerful stack reached the church, driving off the wounded 6+1 leader and disrupted conscript half squad occupying it. They also scared off my Hotchkiss tank, their PIAT threat caused me to move it around the stables to the west and it never got back into the fight. The 1st line HS in the steeple proved to be another matter. It took everything thrown at it even though encircled. They proved to be full blown Nazi fanatics, laughing off a 24+4 attack by becoming an Elite HS with a Hero. When the scenario ended the Brits still controlled the ground level and the Germans in the belfry survived the encirclement 1TC. The next scenario will start with the British Isolated in the church and I have a Fanatic Elite HS isolated in the steeple. Unfortunately, Sean’s sniper twice got kill shots on my sniper and since I don’t control the church my SAN will not get a bonus in the next scenario.

In the south the MMG squad and Light Mortar team in the chateau made the British move cautiously. The Light Mortar was not very useful. It once went on a six shot ROF tear. Net result, one MC passed by both affected squads and five, yes five, British SAN’s of which two were successful. I was grateful when the mortar malfunctioned and X’d out. Sean tried to use the 50L AT gun against the MMG but it was lost on about the third shot.

Then disaster struck. My 10-2 stack keeping the Brits at bay, it had killed a 7-0 leader and broke two squads of paratroops, broke on a 12 +3 attack. I had a major rally point in the woods south of Benouville. The 10-2 attempts to rally and… I can’t stand it….Boxcars…2LLMCs all around. Not only did I lose the 10-2, but the wounded 7-0 broke and ELR’d, a broken squad CR’d and ELR’d and another broken squad was eliminated by boxcars. Fortunately I was able to thin my lines out to cover the loss and still keep the Brits at bay.

About half a dozen squads with some support weapons made the run through the valley south of the stables and were able to get to Le Port with a help from Smoke from the GSW 39H. Unfortunately the GSW 39H eventually ran out of smoke and was unable to replenish that ammunition type during refit for the next scenario.

In the end, the British were unable to expand make any inroads against Benouville itself, but Sean consolidated the buildings between Benouville and Le Port into his lines and well as break up the defenses on the east side of Le Port. His losses were fairly light, four leaders dead (all 0 leadership modifiers except for one 8-1), one squad dead and another relegated to Walking Wounded status. I had considerably higher casualties, eight squads lost although the vast majority were quality garrison troops, a Hero and the 10-2 leader. I had achieved my goal of holding Benouville and reinforcing Le Port while Sean had achieved his goal of expanding his bridgehead.

For the next scenario, Day I, both sides will see improvement in leadership. Sean had 9-2 leader become a hero and he will return as a 10-2 leader. My wounded 6+1 leader in Le Port was declared fit for return to full duty by the medics after his wounding at the beginning of the Night II scenario.

I will receive 32 + dr of CPP for the next scenario while Sean will receive only 15 FPP. It will be harder on me to drive him back because there will be no +1 dawn modifier to non-CC attacks to soften those expected 12 and 16 FP attacks. I have yet to contemplate my reinforcement purchases but I need to look at what I can do to help Le Port. It is vital to any attempt to smash Lovat’s troops in the Day II scenario.

There will be more heartbreak and blood shed around Pegasus Bridge now that the Normandy Landings are in full swing. The Germans have one counterattack opportunity left before the first Brits arrive from the beaches. We will let you know how it goes at a later date.

Ed

Game Photos: Expelling the Guards

In Banzai 11.1, I wrote an analysis of Expelling the Guards. Having witnessed several playings of this excellent scenario at club game days I thought it would make a good subject for coverage. At one game day (May 2006 I think) I was able to take some photos of games in progress. Here you see Rick's Germans going with a strong German left hook attack, just the opposite of the direction I illustrated in my article. In the next photo, you can see the lead tank getting sent home by a sniper.

The infantry follows hard on the heels of the tanks, hoping to roll up the hill from on end to the other.


An exciting little sideshow developed in the Russian rear where Scott's valiant T-60 caused quite a headache for the Germans.


Finally there was a last stand by the remaining Russians at the end of the hill.


Sam and Eric duked it out in the other match. Eric's Germans also chose to go with a strong left hook.


But there was a bit more fighting on the front side of the hill this time.


Just when he needed it, Eric got a smoke barrage down on the hill.


This one also came down to a last charge across the hill, with the Russians just barely hanging on for the win.

Thursday, October 12, 2006

AAR: J105 - Borodino Station

Nick Drinkwater

Russian: Nick Drinkwater [ELR 3, SAN 2]

German: Stephane Graciet [ELR 3, SAN 3]

Journal 7 is turning out to be extremely cool - yet another quality scenario from it to keep the masses happy. This one is a powerful little gem that is small enough to be done in a single evening sitting, big enough to be forgiving of some bad or good dice, has tactical conundrums for both players to beat and is real Russian Front, "in your face" ASL.

For this one, we turn to the grinding stage of Barbarossa - it's now October 1941 and all the easy wins are over for the Germans - now they're starting to get a feel of what it is like to face the endless hordes of Russian peasants who just keep coming, no matter how many you mow down with your automatic weapons. This one is set on hexrows R-GG on the awesome Board 20, probably the best of the old Beyond Valour boards for the variety of terrain contained therein. A single railroad has been added to the board to create the small town of Borodino, scene of an earlier famous defeat of a nasty invader of mother-Russia in the previous century.

In this scenario, the Russians have a tough 'ask' in that they have to control either or both of two large stone buildings (either the 'station' building or the 'city hall') and also have three squad equivalents across the southern most board-wide road in the German backfield - all this to be done over 5.5 turns (and the Russian moving last is important for the assault move / advance options available to them to get the win). Sounds tricky? Well, yes it is, but they get a superb force to do this - 3 x 458, 6 x 527 (assault engineers with smoke exponent of 2) and 9 x 447 which is probably as good as it gets for 1941. Even better, they get some superb leaders in the form of a 9-2, 8-1, 8-0 and 7-0. On the downside, there are virtually no support weapons for this very mobile strike force - just 3 x LMG. Pah! Who needs those clunking great Maxims anyway? We're on the attack!!

Facing off against this finely-honed battlegroup are advance elements of a German armoured division. With their ELR of 3, they've clearly been through a few tough fights along the way, and there are some holes starting to appear in the ranks - automatic weapons is the way to go! In the station, the Germans get 3 x 467, a LMG and a 8-1, in City Hall, they receive 2 x 467, an HMG and an 8-0 and finally they are allowed the option of 3 x 467 to scatter across the defence line to help plug the gaps, as well as 5 x ? to spread around to make a couple of dummies. Even with the best will in the world, thats never going to hold back Ivan and in Turn 1 a small but potent relieving force arrives, consisting of 1 x 9-1, 3 x 467, 1 x 468, a MMG and 2 x LMG who are providing foot escort for a Hanomag and a Pskw 221 (the "leedle tank" for those who have ever seen "Allo, Allo!"). Options, options everywhere.

This game kicks off nasty and brutish from the start - the Russians arrive from offboard straight into the open-ground and woods 'teeth' of the German defence, only one, two or three hexes away from the fronts of both objective buildings. Looking at Stephane's defence, I see a major gap on the west side where I can left hook around, enfilade City Hall and be running into the backfield, with effective bypassing of the defenders of the Station! YES!! Uhhh, wait for it, NOOO! Xavier Vitry, the designer, also saw this fabulous plan, and outlawed it in Turn 1 by making Russian entry occur between AA-R, and only allowing full north side entry on Turn 2 or later - make sure you catch this one...

Anyways, quickly I re-setup and this time we're doing it - straight into the jaws of death at the Station. With that many bodies to get onboard over such a short entry area, some guys are inevitably going to enter open ground adjacent to the Germans on Turn 1, but it is important for the Russians to do some stack management pre-start so that brokies have somewhere to rout to and that your better squads get to use some of the small amount of initial cover. I scatter the assault engineers around to try and use their smoke grenades to hinder some of the firelanes coming my way - what stinkin' smoke grenades would those be? They obviously got left in the mess in Moscow as I never saw one all game (about 9 attempts!). I also use the two Commissars to help get those guys back into the frontline - and yes, you can have two, and I think the Russian needs both of them.

The first wave piles in - Stephane's first two rolls are twelves! I like this game!! Especially as this puts final fire on both squads. His next two rolls are better and the HMG firelane is nasty. Now there are two things that happen in ASL games I play: I will have a really ugly rolling streak for at least one turn and I will fail each and every 1,2 and 4 -1 and -2 Residual Fire Morale Check. In games against Stephane, this will be compounded by two extra events: I will never, ever successfully ambush him and no matter how lousy he is normally rolling, he will always, I repeat always, find the absolute, "fail this and lose the scenario", must-have die-rolls when he needs them. This was to be no different.

I assault move into a bunch of 1-1 and 2-1 Residuals and come reeling back, always broken, often reduced. Luckily I do find one roll with the 9-2 stack that just breaks the 8-1, LMG and 467 in the point-defence hex of the station - these guys roll back and split open the station defenders. Even though my first line has gone down in a wave of bullets, the awesome commissars are doing their rally- factory tricks and sending the peasants back to the front line, after a few summary shootings to encourage les autres (I self-killed a squad and a half overall). With the chink in the factory defences, I manage to rush a squad around to the station west side to enforce a FTR on the LMG squad, break a second 467 on a crucial FPF attack (who then die on FTR due to No Quarter being involed) , and then jump into melee with the final 467 Station defenders.

On the other eastern side of the board, I also crucially break the 8- 0 and HMG/467 in City Hall and then critically force the other defending 467 to drop concealment on a gacked attack. Stephane is faced with a tough decision at this point - should he stay to try and rally and then get the HMG firing again or run and get bodies back into the fight later? He takes the safe action and runs back to the backfield and I waltz in and pick up the Germain HMG! Yesss! Following this, I then jump into Melee with the last City Hall 467 with a couple of my own squads. We then, of course, both proceed to fumble all our CC rolls, but at the end of Turn 3, all the initial Germans are either dead, in melee or running away.

Stephane's Hanomag whacks one of my squads on a very long AAMG shot on a thin-but-there LOS which was a bit needless and wasteful on my part, and his 8-1, MMG and 468 reinforcements are now entrenched in the stone building overlooking the Board 20 "circle" (familiar to those who've played "To the Square" and "Acts of Defiance") - they knock off another of my squads who try and dash across the road and my attack is effectively being cut in two by this firelane. I eventually kill off in CC both the last remaining City Hall and Station defenders for the loss of a squad in return, and then whack the 8-1 when he fails to execute a successful ambush of a CX conscript.

Both the building objectives are captured but I have taken some big hits in return. Stephane is now well placed across the board to make it difficult for me to get anything across the road, and the clock is ticking. I do remember to pick up his abandoned LMG in the station and then start to challenge the "leedle tank" with it - this is the only thing that is stopping me crossing the railway line for the advance to the southern road net. This could be brilliant - I may just be able to shoot and kill the German armoured car with one of his own weapons!

I miss killing the "leedel tank" at 2 hex range the first time by one, aargh, so, as a random shot at start of Russian T4, I try again: roll a three - HIT! Snakes - kill, BURN! Awesome! Hoisted by his own petard and kind enough to leave me some nice friendly smoke to cover my dash across the railway too - think of the style points baby!! In the same turn, I break the only 467 (and 8-0) defending the wooden building line south of city hall from a big FG from the captured HMG - this nicely opens up the entire eastern half of the board.

Seeing this hole, I run a 7-0 and 447 past the broken guys so now I am adjacent to the 'road that must be crossed'. Crucially, the MMG strongpoint is also fired out, so spotting the opportunity, I am able to run at full pelt the 9-2 and 2 458s for 8 hexes over to the east side of the board to be in place for T5 and T6 assaults across the "road". I also run a commissar-led assault due south of the station through the woods to the southern rowhouses, next to the gully, where I force to rout two broken squads back across the southern road.

It's all or nothing time now for the Germans - Stephane revs up the Hanomag to come and put hurt on the redirected 9-2 stack and survives 4 cases of Street Fighting from my guys (where did my good rolls go???!) and sticks it right in the path of the Russians. I try to dash the 7-0 and 447 across the road, but go down to a three on a 1-2 attack - Stephane pulling out the die-rolls just when he needs them. Crucially my half-squad doesn't break on the K/1 result, but I am now really only placed on this extreme east side to get only 2.5 squads across the road....nightmare!! His HMG killstack then pulls off four 1MC results in a row to still be able to interdict almost all the streets in the region. Next, his last squad in the rowhouses manages to ambush me (6 for me, 1 for Stephane) and just withdraws next door to again interdict anything that dares try to cross the road, and then to compound it, one of the broken squads (with LMG) manages to pull out a three on a miracle self rally to put more hurt on my brave Ivans with added firelane potential - freakin' unbelievable. Finally, Stephane's sniper hots up for the only two shots of the game - the first sticks one between the eyes of the 10-0 commissar, the second breaks a 247 HS in the building next to the gully. This is horrible.

But lady luck, though sticking me in the ribs and kicking me in the nuts, did decide to smile on me for one last turn. In German T4, after two more failed Russian PAATC for Reaction Fire on the Hanomag (yuk) and a "missed by one" PAATC by the 9-2 leader (would you credit it?), the two 458s do find some grenades and I manage to whack the tiresome Hanomag at last. In one last desperate Defensive Fire shot, I again despair as the 8-1 leader with the MMG passes his third 1MC in a row - can you believe that - 5 passed 1MC on that stack in sequence? - but luckily the manning squad rolls a 10 and start to ask about "the location of Mommy". However, if the leader is able to rally these guys back in Turn 6, this is going to the edge...

Turn 6 starts - they miss the rally by one!!!! PHEW! This is the gap I need...I charge all my rowhouse units out across the street - they all go down in glory, but most importantly, they fix German covered MG arcs and use up all the German defensive fire options, who are all then fired out. Once that is gone, I am able to saunter the three squads from City Hall who used to own the now discarded German HMG past the broken MMG squad yelling, "yaah, Fritzski, look at us - we sneer in your general direction" and gain the win!

Awesome, heart stopping ASL at its best. This one has the hallmarks of a classic and must be tried - there was never one point where I ever felt totally comfortable about this - the Germans always have the chance to stop this one right to the end - even after clearing out both objective buildings by the end of Turn 3, there is still tons to do as the Russian and two more "roads" to cross (the railway and the southern road) - and the MMG is still critical to stopping you at this point. The biggest two events that changed this were the destrucion of the "leedle tank" to a 3 and 2 combination, and especially the loss of the 467 and 8-0 in the wooden buildings on the east side, which opened up the defence significantly.

Turn 1 is important but not completely critical to the result of the game - both sides can survive a bad Turn 1, but some thought needs to be given to the Russian setup with rout paths, stacking and placement of the commissars. It may be possible once onboard that the Russians could get a human wave going to get across the street, though there was never the opportunity or the need for me to do this. Things to read up and get comfortable with in this scenario are all the first, subsequent and final protective fire principles, Commissars and their effects, street-fighting and reaction fire, dash, and all the Fire Lane details as they are a major component of the battle. The Russian should also note the possibility the gully offers for some cheap and sneaky routes to win.

Great scenario - strongly recommended. Thanks Stephane for that one and especially for leaving the Armour-piercing incendiary bullets with your nice shiny LMG!!!

Nick (still trying to remember where we packed them thar' smoke grenades?)

Monday, October 02, 2006

AAR: KE20 - The Steel-Eyed Boys

Nick Drinkwater

German: Nick Drinkwater [SAN 3, ELR 2/4]

British: Tom Gillis [SAN 2, ELR 3]

September's game day was at Walter's house - this lies in some long lost forgotten corner of the greater Houston area , somewhere lost in the wilds, wait for it ... OUTSIDE THE BELTWAY! I mean, man, for us ITL types, that's like, Canada, right? I'd prepared for this expedition into the unknown by retaining a spare cup of coffee for any emergency that cropped up - this was done through the cunning plan of throwing it all over my lap at breakfast - when times got really tough, I could always pour milk on myself and suck out the sweet caffeinated nectar and imagine I was having a Montrosian-latte. (Note that even this desperate measure would be better than anything you get served in Austin...!).

Anyways, having noticed that the map for this area was almost empty apart from the words "Here be dragons", I employed a local guide (Tom) to hack through the undergrowth and guide me to Walter's, where to my pleasant surprise, Ken, a fellow ITL-ite, had also managed to make it through the wall of death, bamboo spears and headhunting cannibals. Even more impressive was he'd found this oasis single- handed - no stinkin' guide for him! Brave fellow indeed! Two ITL-ites in the same wilderness room at the same time on the same game day? The world really was upside down today.

Before the game, Tom and myself had decided we want to play something meaty - however, Tom's been playing like, forever, so we also wanted to try and find something he hadn't played before which was harder. Luckily, I do have some of the Kinetic Energy scenario packs which I'd bought years ago and there was some 'new' stuff in here which looked tasty. The problem many people have with the KE stuff is that they automatically assume the VC are going to be very confusing or that there are pages of impenetrable SSRs to wade through ... I don't think is really all that true - granted, there are some challenging ones in there (the mobile German "democharges on tracks" rules is one example that comes to mind), but there's also a lot of good straight- forward stuff in here as well, usually with interesting twists (I'm keen to try the four-phase "Dreadnought of Razne-thingy" scenario some time) and of course the ultimate three-player challenge, "The Dogs of War", is a KE special. If you are looking for something new and you have a good few hours, then I would recommend these scenarios strongly.

In the late nineties, KE had done one scenario pack that was of real interest to me - this was the march of the British 53rd and 11th Armoured Divisions across northern Germany in April 1945, taking on the reserve and replacement battalion of the 12th SS HJ division and a recently constituted Marine division - these scenarios are largely based on an excellent book called "No Triumphant Procession" that is filled with very descriptive small unit actions. I had actually bought this book last month on Amazon and had just finished reading it and so was itching to play something from it, though I don't actually own the original "At the Sharp End" scenario pack. I do however, own a series of sumptuous colour updated scenarios that KE issued to amend a few perceived balance issues with some of their earlier packs - 3 modified scenarios from the original British pack are included (Black Friday, Franzen's Roadblock and The Steel Eyed Boys) and all look quite fun. We opted for The Steel Eyed Boys, and I was happy to play the bitter and desperate SS, whilst Tom took on the challenge of a very tasty late war British company from the Rifle Brigade with plentiful armour support from the 11th AD.

The action is set on a slightly odd board configuration of Boards 11 and 18 with their level 1 hills flanking the trusty stone village of Board 10, rowhouses and all. Environmental conditions are moist, but a stiff breeze is blowing smoke from two burning British tanks right across the frontal southernmost buildings of Board 10 at start. What at first seems odd is that the Board 10 village is right at the 'front' of the German defence line and the Brits can simply walk on in Turn 1 and start fighting immediately for the buildings. The Germans set up between hexrows EE-U, right in the centre of the village whilst there is the whole empty half of the board 'behind' the main scene of the action - odd huh? However, this configuration is explained by the somewhat advanced nature of the VC - the Germans can win by having 15 VP on board 10 and/or exited offboard from the north, back edge of the playing area, but to do that they are going to need to beat a desperate retreat across the open half of board 10 under the guns and noses of the well armed and armoured Brits sat on the heights - a veritable reverse Valley of Death!

The Germans can also win by retaining control of eleven board 10 building / rubble hexes at game end (all board 10 buildings start under German control at start, even those outside the original setup area) at game end after 7 turns, or finally, by achieving an instant win by inflicting 20 CVP on the Brits. The Germans are very tasty but apparently brittle - 12 x 658s, 4 x 348s, 1 x HMG, 2 x MMG, 4 x LMG, 4 x Psk, 2 x DC and up to 28 Panzerfausts. Pretty damn good, especially as we will be mainly conducting a stone building defence. The big problem they have is very weak leadership (3 x 8-0, and a 7- 0, all ELR 4) and that there is a strong possibility of their main squad contingent reducing down to a 447 (SS) very quickly with a ELR of 2. Hmmm. Less good - I expect to see numerous 447s by scenario end. Finally I receive 12 x ? in addition to those received due to British offboard setup, so I need to set some good dummy stacks - this combines nicely with a 2 HIP squad equivalent potential to create a few tricks for unwary British tanks and three boresighted locations for the machine-guns.

The Brits, despite their late war "lets avoid undue casualties" ELR of 3, are awesome: 18 no-cowering 457s, 4 x 247s, 2 x Lt Mtr, 6 x LMG, 2 x MMG, 4 x Piats, 6 (six!) Comets and 4 M5 halftracks. In this environment, with no long-range enemy AT assets or armour to worry about, the Comet is a brilliant tank with both SD and SM (3-hex range), 6FP of MGs and a 12 FP equivalent 77L gun for knocking dug-in tough guys out of stone buildings. They also have outstanding leadership (9-2 plus a load of 8-1s and 8-0s) - a really nice mobile, late war assault group. They also have the boards and armoured mobility to surround the village in very short order whilst the bulk of their infantry are swiftly assaulting the village the hard way from the front. Knowing that Tom plays hard and aggressive on the attack, I quickly reject any notion of being able to slip off a bunch of infantry through the open area to the north of the village to get some easy escape VP - he's far too good to let that happen - so I set up for an all-round contracting defence of the village with the intention of trying to hold eleven building hexes or get him on the low CVP cap (another mechanic to reflect the quoted wish to avoid excess casualties on the behalf of the British), finalising on the big Board 10 factory where all my troops will be fanatic by SSR. Recognising but yet rejecting the 'escape clause' made the setup a little easier as I was able to be more focussed - all the HIP and boresighting traps were put in place to whack incautious Brit infantry or tanks in the environs of the village - a HIP PSk HS in woods on both the east and west side in middle ground locations and a 658 MMG combo in the backfield to try and put the hammer on slack Brit squads creeping around to seal off the rear.

As expected, Tom moved two split armour forces with HTs to the northwest and east of the village to seal off any immediate thoughts of running offboard. He also moved in strongly with a big ground assault directly into the teeth of the defence on the southwest and southern sides of the village, supported by a couple of Comets, trying but failing to find SM shells. I had set up tough with the big HMG stack in the factory and then squads and dummies scattered evenly around the rest of the village. Through armoured assault Tom marched hard onto my outlying defences and I missed three PF shots and 2 PSk shots in a row - eventually I managed to find a 'Shrek shell and reduced a Comet to atoms and started the VP assault (two for the crew only, vehicles not counting against the balance). Tom also tried to jump an isolated half-squad in hexrow EE in CC - these guys were total heroes and managed to whack two squad equivalents over three turns before going down on the fourth attempt. Despite missing another ambush with a concealed squad against a CX half-squad, I eventually managed to get them too - Tom's VP cap was rising sharply by Turn 2. I was however, taking some sharp knocks in return - an outlying squad was encircled and then wiped for FTR (no quarter in effect by SSR), and other squads and half-squads were being reduced or eliminated slowly, especially in the SE corner of the village.

Seeing the need to get more cheap victory points by killing tanks with Faust fire, I ran another two squads out into the woods line on the southwest side of the village, but these guys got hosed by a +6 shot from an adjacent Comet despite smoke, woods TEM, buttoned up and a CA change. Eeek. I did manage to smoke another Comet from a long- distance Shrek shot (two more VP), and knocked off some riders for some more VP. One of the HIP half-squad traps whacked a British half- squad adjacent in the open, but I also had a MMG fail for a heart- stopping turn before recovering. Turn 3 was absolutely horrible - in another missed by 'one' shot sequence, I rolled a series of 9, 11, 10, 11, 8 and 9 for a series of To Hits and IFT rolls - my "usual roll horribly in one long sequence" event for any scenario I play. At this point, the defence was collapsing badly and although the British CVP cap was at 12, things were breaking horribly everywhere. A Psk X'ed on an 11, a half-squad rallied themselves to death on a 12, and one of my leaders did the same - to counteract this Tom X'ed one of his two FT (oh yes, the Brits also had two FTs!) on his first shot. Then he berserked one of my whole squads who subsequently went down in a hail of flame and gun fire. Despite this, Tom was still having trouble getting all his units co-ordinated and focussed at any one point or place at any one time, reflected by an inability to rally a 8-0, 2 x 457 stack for three turns. In contrast, I managed to battle harden my 8-0 with the HMG to an 8-1 - a vital turn of affairs as it turned out.

By Turn 4, things were getting desperate for me - my counter attack in the woods had failed, my HMG squad had broken and with two other squads, were forced to rout to the back of the factory with the 8-1. Only my very backline was holding tough with a 658/LMG and a 658/MMG FG holding back the British mobile force at the very back of the village. I had to rally the Factory HMG force and this is where the Fanatic bonus allied to the additional -1 leadership from the battle hardened leader just did the trick - I managed to just rally the lot of them, and then moved back to the front of the factory and reclaim the temporarily lost HMG. We then ended up in a Mexican standoff with Tom's 9-2 and 2 x 457 stack which were now like a rabbit in the headlights: in the open amongst the swirling smoke - who would blink first? Tom crucially rolled an 11 on the Brit Prep Fire in T5 and my big stack came through unscathed. I then whacked him hard in the open with a -1 directed HMG - I managed to firstly pin the 9-2 in return and then break one of the squads, but most importantly, kept rate. Further fire CR'ed the broken squad, broke the unbroken 457 and managed to break the 9-2! Yaay! To add to my fortune, Tom was unable to rally the 9-2 in German Turn 5, and I kept the pressure on with more ROF which CR'ed the half-squad. Bigger Yaay and another VP. This fire only wounded the broken 9-2 however, and the last broken squad pulled out consecutive snakes on two 1 MC - the first resulted in disruption, but they weren't adjacent and no quarter was in effect anyway, so this was like a null result for me. The second snakes was for me even more heart-breaking - battle hardening and hero creation was a result and these guys were now pretty much unscathed. I was 1 point away from victory but out of bullets in this part of the village and feeling gutted.

Luckily though my backline was still there, fighting hard, rough and tough. I knew that if I failed to scratch any of the British infantry now, I was probably going to lose as I had already missed with a long range Pf on one of his tanks and I had also had one further shot at another broken squad in woods, but these guys had also passed a game winning MC with yet another of the many 4s that Tom rolled on his special dice. Tom had both my backline key squads double-acquired by three Comets and it was only going to be a round or two before I went down in a hail of tank shells. I had one final 16 FP shot left at an unbroken squad in a stone building - amazingly, these guys broke, and best of all, both MGs kept rate! Woohoo! The follow up shot was crucial - again a 4 on the IFT for me and a 1MC for Tom. Heart in mouth time. Pass this and there is nothing left to shoot and he's going to be carving me to small, feldgrau coloured pieces...

Tom rolls a 10. The squad casualty reduces. 1 VP for me. The magic 20 CVP cap is reached. Game over. German win.

Awesome game with a great opponent - the guys in Texas are such fun to play and Tom's a star! We had the usual ASL madness (a berserker, three cases of battle hardening, two fate die-rolls for the Germans, my sniper landing directly on Tom's sniper to remove it from the game, five malfunctions (three for Tom, including the FT and two Comet MA (one repaired)) and much end-game nail-biting desperation where every roll counted. In post-game discussion, we both thought Tom had probably pushed a bit too hard too early - the loss of the two Comets was four good VP for me - he also was very unlucky with the half-squad from hell CC which also took another four VP. His inability to rally the 8-0 stack was important as their extra firepower would have been helpful too. Finally, despite my usual mid- game dicing of myself, I did receive some top ROF die-rolls at the very end to just send Tom over the CVP limit - if I hadn't done that, he would certainly have won the game on the other VC as I was fast running out of troops to hold buildings and the British still had troops in abundance - I had under 50% of my force left at game end and I was seriously acquired by the tanks - the last round really was a round of all or nothing and luckily it just paid off.

Great scenario, much fun, needs some careful playing with both forces and demands some tough decision making for both sides, which is always the sign of a good ASL scenario. Recommended.

If you have comments, as always, would like to hear back!

Nick

Tuesday, September 12, 2006

AAR: J110 - The Prelude to Spring

Nick Drinkwater

German: Nick Drinkwater [ELR3; SAN 3]

Russian: Stephane Graciet [ELR3; SAN 2]

The first, second and third questions the german player has to ask himself when starting the setup for this scenario is "How in the hell do I stop that lot with this?" The fourth question is "When do my tanks arrive?", the fifth question is "No, really, when do my tanks arrive?" and the sixth and final question is "Can we play something else?"

BUT, you must hang in there as this is actually quite a neat scenario. It will be one continuous Personal Morale Check for the Germans from start to finish, of that there is no doubt, but if you can stop those Russians, you really can slap yourself on the back with a feeling of "job well done". It is doable, no question, but you will really need to think hard about the initial setup and play a very good game defensively or you will get steamrollered. There are options and there is some flexibility, but this is tough...

We're in December 1944 in southern Hungary - the siege of Budapest is about to start and the Russians are starting to close the loop. In this scenario, a very tough Russian Armoured breakthrough unit needs to get 22CVP off the west edge of a mixed farm and woodland configuration of half-boards 18,43, 4 and 17 laid widthways across the playing area (hexrows R-GG) from east to west. This Russian force has a lot of fun toys for both the breakthrough phase (2 x IS2, a SU- 100, and 2 x T34 85) and the initial attrition phase (8 x 458, 2 x 248, a 9-2, 8-0, couple of LMG and a .50 cal HMG - ouch!). They have effectively 30 hexes to cross over 8 turns, and at start, a really brittle german screen to try and impede them. As the Germans have no anti-armour assets onboard until Turn 3, sneaky armour rush tactics of trying to go full speed and get off in two turns have been stopped by SSRs which means that the Russians can only move half MP in Turn 1, and cannot exit the board until Turn 4. The key to a Russian victory here therefore, is to really apply confined arms tactics - if the germans can kill a couple of tanks and separate the infantry from their armour then they have a much better chance.

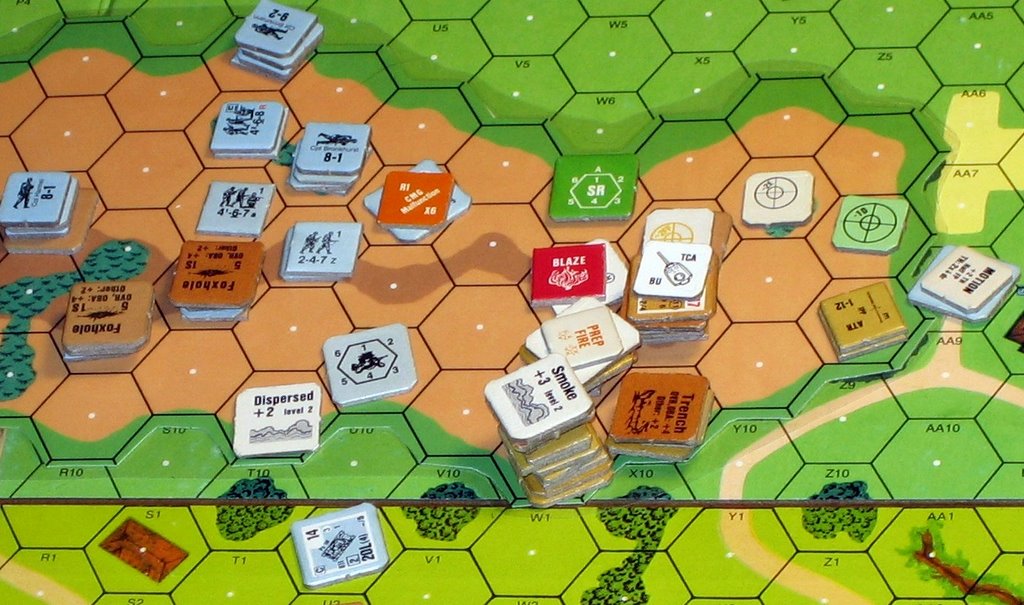
I think the German setup for this is one of the hardest I've had to do during my time playing ASL. As it is December, all the grain is open ground and there is ground snow in effect. The board configuration means that the Russians starting on Board 18, must initially walk across the Board 43 'grain' before they can hit the safety of the western woods mass. Next board for them to cross is Board 4 which is not easy as although there is some small woods, they tend to be isolated in big patches of nothingness. Finally, they need to cross the half of Board 17 with the small stone building and the scattered woods, though there is another 'open glade' at the very back which may prove tough for them to cross. I have been provided with 4 1/2 467's to start with, a Lt Mtr, a MMG, an LMG, and a 9-1 and 8-0. Oh. I have also been given a Pak 37 which has a straight 75 Gun with a B11. And that is it. That is not good. The first thing to decide is where to place the Pak, which for this time of the war, is truly AWFUL. It's basic TK is 14, while the worst of the Russian frontal Armour Factors is 11! It does have HEAT, but the TK of that is 13 - no help there then. So you need to be thinking hard about sly side and rear shots to do anything with this relic. With all that open ground that the Russians have to cross in Turn 1 and 2, it is very tempting to put the infantry screen upfront to take advantage of the opportunity to inflict some cheap kills...I got sucked into this, and had everything concealed in a scattered line with the plan of doing one, maybe two rounds of shooting, before doing a very fast fighting withdrawal back into the woods on the east side of Board 4. You also need to try and make the Russian armour cagey about the faust threat (2-hex range) so that they don't simply bypass you at their leisure so you do need to spread out a little, but this is really tough to do and yet try to be mutually supporting with only 4.5 squads across a 16 hex wide half-board. I put a squad, LMG and 8- 0 on the far southern board edge to stop any Russian rush down the south side in the shelter of the Board 43 walled compound and then put the 9-1, 2 x 467, MMG in the middle of the board either side of the main road that bisects Board 43 with the 247, Lt Mtr and the last of the 467 infantry to the north to block that side. I declined to put the Pak in the upfront defense line as the OB gives the Russian two starting throwaway half-squads solely for the purposes of sucking up fire and to test woods for hidden guns, and the value of this piece lies more in its potential threat and keeping the Russian armour honest than its real ability to cause any lasting damage. As a result, I place it in the sneaky and hopefully unobtrusive half-hex of woods in GG4 on board 4 where it has a relatively good view across much of that board, east of the diagonal hedge line, but it is far enough back that it won't immediately be found out by the Russian infantry screen.

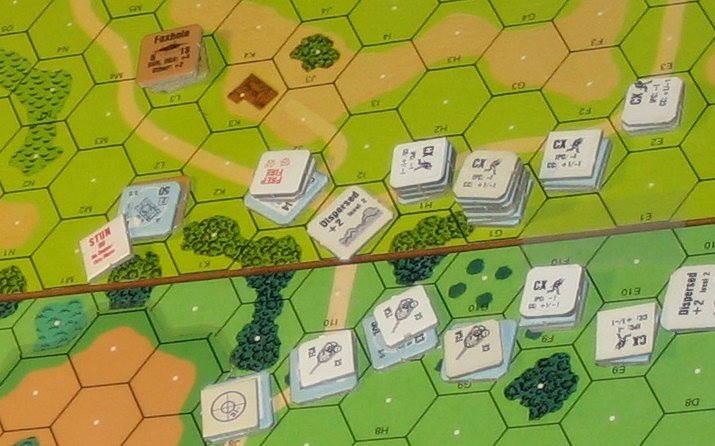
So, still feeling really tentative about the setup, we kick the thing off. After Turn 2 and some truly horrible rolling, my 9-1 and 467 with the MMG are dead without having fired a shot, my south flanking 467 is prisoner, the 8-0 leader is interdicted as he desperately tries to run back to the southern side of board 4, and the the Lt Mtr has broken down on its first shot. The reserve central 467 is broken and about to go down as prisoner and I am left with a concealed 467 and a lowly half-squad with a duff mortar. Man, this was ugly, and it wasn't even Stephane's armour that did the carnage. He actually fired off all the tanks at my concealed squads, something that I was very happy about as he had three tubes in there with Low Ammo B11s. He missed everyhting on Turn 1 with these, but didn't drop the ammo either (in fact he did not suffer a single break down or ammo drop of a single gun all scenario long, including the LMGs - these are obviously some of the newer, better weapons out of the Ural arms factories I guess). However, he also had that 9-2 with the .50 cal HMG and this is what really did the damage - stacked with a couple of squads firing at long range to my guys in the woods, he was still at 6-1 shots, and went through my concealed guys like a knife through butter. My southern flanking squad went down to some lousy CX 4+2 shot and my rolling was generally horrible (see below). I had one good opportunty to whack a squad in ambush from a concealed 467, but he rolled the required 2, dodged the ambush and killed me in melee (I have never ever actually won an ambush with Stephane!). With the hole created, the Russians surged through the middle and south side and they were off and running. In reflection, the 9-2, HMG combo at startup is really tough to beat, even if you are concealed, and it may be something to consider by making much more of the initial foward line actually set up at the back of Board 4 in a backline defense, so they can still be alive and help out when the armour comes. Like I said, this is a tough, tough decision forcing setup for the germans and needs a lot of consideration.

So Turn 3 kicks in, the Russians are busy killing off the last of my front-line defenders at no cost to themselves and the first Russian armour ventures into the middle of Board 4. It's a T34-85, a great and common tank that we really don't see enough of in east front scenarios, and it has 16MP. Though I'm hoping it and maybe one more tank will stop in my kill zone of the Pak so I can maybe get two tanks, I'm aware that it still has a lot of MP and it is about to disappear out of my LOS; there is no guarantee that a second one will appear, so I drop HIP and stick one up the tail-pipe. My first casualty caused on the Russians so far. In response, a couple of nearby Russian squads immediately make a beeline for the gun, and though I blast one squad, most of my resultant fire is horrible like normal and my valiant crew are straight into a melee fighting for their lives with a 458 and the 8-0, having just rejected the surrender of the broken 458. This melee goes on for three turns more (heroes!) and I manage to CR the squad before I go down in a flurry of grenades and bayonets. Still, that is another squad and a half out of the game as they don't have enough MP to make it off in time, and overall that crew and gun has bought for me a tank, two squads and a leader. Not bad at all.

I then rush on my reinforcements but am instantly faced with the same problem at the back as I was the front - 16 hexes of broken woods and open terrain to cover with only 2 1/2 467s and a 8-1 / LMG this time - far too many avai;able sneak-by routes for the Russians. We also get a Panther and two MkIVJs to balance out the armour, but I am really staring a hammering in the face here. By T4, Stephane has an amoured mass in the west edge of Board 4 adjacent to the woodier part of Board 17 and is just waiting for the Russian infantry to catch up. I send a Mark IV to the south where I have a great view of the Motion SU-100 but he can't be seen by anything else, so I pop off a shot and miss (9). I also send the Panther to the north to loop round where I have a great view of the other T34-85 but again miss with the bounding fire (10), and the T34 goes into motion. My other MkIV goes into the middle woods Board 17 road to block any quick and sneaky rush by the IS-2s. Next Turn, the SU-100, with little other option drives forward at me, I fire, miss (11), IF, miss, gun breakdown (11). Great. On the north side, the T34 charges at the Panther, so I fire, miss (10), he keeps coming at me, so more IF, miss (9). Awesome sequence of rolling there - I'm now just dicing myself. Stephane then misses adjacent with his BFF shot and then does one of his usual tricks and re-starts and enters my hex in motion, and compounds this by sending a squad in for CC, but these guys also fluff their attack. Still, not a good place to be in at all. Next turn, my MkIV with the broken gun goes up in flames from fire from the SU-100, and he sends one of the IS-2s after one of my sole surviving squads in the Board 17 woods. However, I still do have a mobile Panther and with my current location being distinctly unhealthy, I line up the 9-2, and two 458s in open ground for a fantastic 16-1 Overrun - net result, one broken squad on a 1MC (roll a 10 on the IFT). More horrible, horrible rolling.

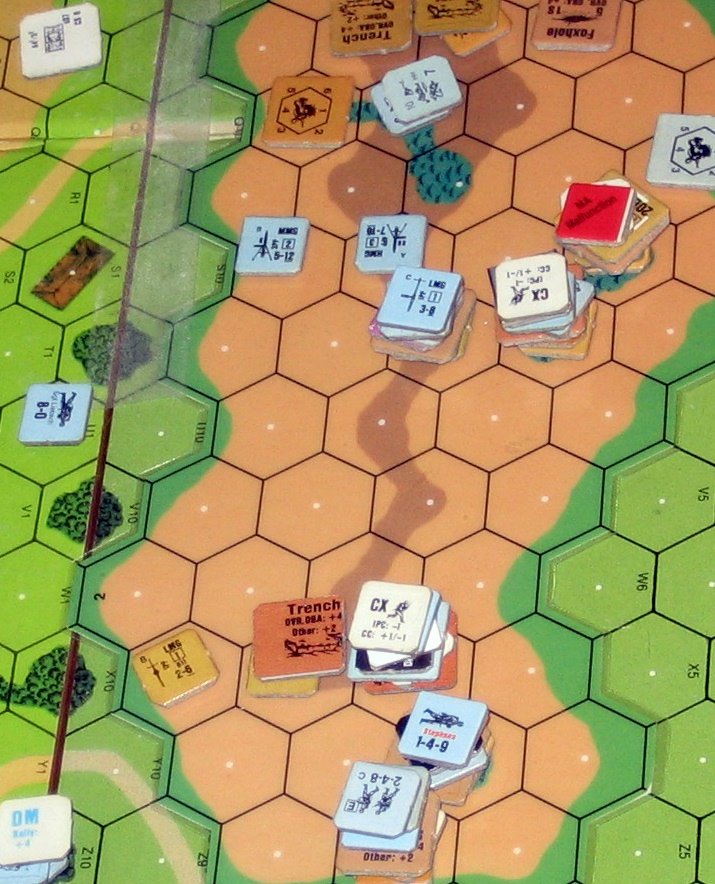
With the destruction of the southern most MkIV and the elimination on snakes of a subsequent half-squad I moved into the hex to threaten dashing russian tanks with fausts, Stephane takes the wide-open opportunity to drive off both the SU-100 and one of the IS2s (including a 8-1 AL) for 17 very easy VP. Eeeek. Only 5 left to find and get off the board. Luckily I do claw one small victory when I flame the other IS2 with a 8-1 directed AFPh faust shot in the woods road, but things are grim. And then we do a quick reality check - I actually now outnumber him in tanks by 2-1 and he now has only the last two turns to get off the remaining infantry or the other T34-85, and the infantry's path is not easy as they have to go across the last open glade on Board 17. Hmmm. Certain defeat into possible victory?

I trundle the Panther over to the north side again to challenge the last Russian tank, and though it misses on it's Bounding Fire shot, it whacks it hard from behind next turn in DF - however, importantly the T34 does not burn (a nine on the TK) and the crew get out - another of numerous examples of Stephane just getting the critical roll when he needs it (not unknown in our games!). I can't even get them with MG fire on hazardous movement as they jump out either as I roll another 10. Stephane tries to jump my northern single squad in CC, but I casualty reduce them and he rolls a 12 so I am able to withdraw into the isolated stone building to help block russian victory routes. But as is symptomatic in this game of widely swinging fortunes, he tries one 8+4 attack by an adjacent CX 458 and of course pulls up eyes - needless to say I fail the 1MC. Normal service has been resumed. My only other squad is now in the only other isolated wooden building on the south central side but I do have a LMG to throw out firelanes across the path of the numerous Russians who are desperately trying to run off through the glade. To help stiffen the last ditch defense I even take a very risky big ESB move with the surviving MkIV which just pays off and gives me enough MP to peak around the woods so that I can now see the whole of the Russian exit area.

The last two turns are desperate - the damn T34-85 crew escapes off the board and Stephane is also able to sneak off another HS as they shrug off both the Firelane and as much DF and Resid as I can lay - this does not come completely without some cost to the Russians: the 9-2 goes down in a hail of lead and every MC and pin result is critical and they do fail a few (though not a one from the 1RF firelane). I stop most things dead in their tracks and do kill off one or two squads, but one critical result is that a MkIV overrun against a lowly Russian half-squad results in a damn berserker and another attack generates a Hero! Madness, but Stephane is always able to pull out the critical check on demand and finds lots of 2s, 4s and 5s (but only one warm SAN inducing 3 in the entire game!) when necessary. At the beginning of German T7 he is at 20VP and just needs one squad to make it off and he realistically has three units that could do it. I run the Panther down adjacent to one squad in woods in hexrow 2, but miss again with BFF on main armanent and MG - no matter, I'll get him in Russian T8 when he makes the dash for victory.

And so we come to it. Russian T8. And here the berserker half-squad really hurts as it eats up attacks - first it uses up my LMG and First Fire capability of my last squad. I whack a couple more squads in SFF but the MG goes and breaks (of course), and he has used up a lot of my fire opportunities. Stephane takes the next units here (HS and the hero) and shrugs off a 1 RF with ease, so I throw out an adjacent Final Fire that causes a NMC - the hero fails is wounded, drops to 3MF and will be unable to get off (yes!) and the HS..........pins!!! YES!!

Only two units to go...the squad adjacent to the Panther tries to run out of the way by looping around the tank in the board edge woods, I follow and change CA with the adjacent MA, fire the gun....TWELVE!! Un-freakin-believable. I try blasting with 16+3 firepower MGs....the last shot to deny victory to the Russians...and of course, I roll a 10.

Cue Russian cheers of victory and big smiles all around as the squad strolls off for the victory. Cue general unhappiness and distraught look again on behlaf of the Germans, as I of course have basically diced the crap out of myself.

Another awesome game with Stephane that took its huge emotional toll - he played really well and until Turn 6 played it perfectly - the mad dash for the easy VP by the two tanks actually hurt him a lot as it gave me a lot of local tactical freedom on the southern half of Board 17, especially so when I managed to toast the other IS2 with the Faust. He was now outnumbered in armour and the T34-85 was always going to struggle with the Panther still alive. Effectively his infantry were left to hoe it alone and although I only had two squads left, I almost pulled it off apart from some dud rolling at crucial times. If he had left both tanks on for a turn longer, I think he would have strolled to victory as I would have been forced to use my panther and Mk IV for other more suicidal things to try and kill the tanks and the infantry really could have waltzed off without too many issues. In post-game discussion, we both thought that the at-start placement of the Germans is critical in light of the threat posed by the .50 cal, and perhaps a rearward defense may be the way to go - this is especially emphasised as behind the board 4/43 forward woods mass is a lot of open ground on Board that any retreating Germans are going to really struggle to get back across in the face of marauding Russian tanks. Also, with sixteen hexes of boardwidth to try and defend against that much Russian threat, we felt that the German infantry reinforcements needed boosting by one squad - which funnily enough is just what the official balance is (+LMG). There is just too much ground to cover with 2 1/2 squads and it will only take one lucky shot at the very end to carve a very big hole in the defense that the Russians could pour through.

Anyway, it is a lot of fun, very desperate and I would recommend that the more experienced player always take the Germans as they are the more unforgiving of even the smallest mistakes. Also, note that there is a confusion that hasn't been sorted out yet between the marked entry point for the Germans on the track record (Turn 2) and that quoted in the OB setup (Turn 3). We played Turn 3 based on comments online from the designer, but this does need a swift and speedy resolution by MMP.

I would really welcome other's people's experiences of this one, especially if they have played the finger-in-the-dyke germans.

Nick

Follow-up to J106 AAR

Nick Drinkwater

Hi Eric,(I posted this to the community as I started to get a bit philosophical and I thought some might be interested - also, may be able to come to Austin in late Jan - see below).

Many thanks for the kind words - I try and give a bit of my (admittedly) somewhat laymans view of the scenarios and the tactical options I've taken, as well as an interesting summary of the action as it happened without going into the intricacies of every die roll. I freely admit that I'm never going to be as analytical of the game, the terrain and the percentages as some who have more chess-like brains than me, and due to the nature of life at the moment, I'm always going to be a little ring rusty after several weeks of non- play due to work-requirements, followed by an intense burst of ASL- ness, before going dormant again. I wish I could play more and on a more regular basis but c'est la vie. So, in an effort to retain a slightly broader view of the game in the AARs, I always try and identify the high and low(!) lights of the scenario, and those key passages of play which strongly influenced either my decisions or the final result; this being a dice-based game, this will always include those outrageous moments of good and bad fortune that we all suffer in this most addictive of pastimes - this is something I think every player can empathise with as we've all been there at one time or another.

The other thing I try and do is always keep an eye on those small and big things I've learned during the scenario as I am keen to try and improve my general gameplay - I've had many useful feedbacks from Zeb in particular (Thankyou, oh mighty Zen Master!) who has been great in showing me when I've sharked people on some critical 'buried in the rule minutiae' rules-slip. I personally think his AARs are outstanding, but I think quality AARs is a trend that reflects well on Texas ASL with the recent amusing efforts by Tom and the brilliant illustrated AAR by Matt showing this so well. Thanks to the guys for their effort with the Banzai Blog, which is an innovative way of getting this work by so many into the public domain.

I would love to play you FTF, as, as you have noticed I don't really do VASL - I live in central Houston, but it may be that for the last weekend in January I may be free to come to Austin for a long weekend of gaming if anyone's up for it, as my wife's probably going to be away that weekend - I can't fully commit to this yet as we haven't booked any tickets and work has not decided on it's 2007 plan for me yet, but it could be possible and it would be great to catch up and push cardboard. Hopefully yourself, Zeb or some of the others may be able to just make a provisional note in your diaries?

Hope this catches you well - new AAR sometime this week as I'm trying to stem Stephane's russian horde in J110 Prelude to Spring this afternoon - a forlorn cause if ever there was one!

My upper lip is the definition of "stiff" - comes in the genes, old boy!

Cheers

Nick

AAR: J106 - Marders not Martyrs

Nick Drinkwater

German [ELR 3, SAN 3]: Nick Drinkwater

Russian [ELR 3, SAN 2]: Stephane Graciet

A very simple one-evening-special scenario out of the new Journal 7, which has the closest feel to an original Squad Leader scenario I've experienced in a long, long time. Not surprising really as this was originally apparently slated for ASL Starter Kit 3 before a decision was made to not include open topped vehicles as part of those rules...as a result it was easily retrofitted back into regular ASL and now forms a simple intro-plus scenario to vehicles with the added spin of needing to get familiar with OT and hull-down rules. As a bonus, the new ASLSK board v was included in the Journal as it is needed to play this one - this board has a good open Russian country feel to it as there are no hedges or walls, but its applicability to represent a western European battlefield may be a little more open to question.

It's the late summer of 1942, the grain is in season, the orchards are heavy with fruit and its a nice summer day. The play area includes approx 2/3 of the board with the Germans defending the backfield area across two low (hills) with a couple of isolated wooden buildings and the board edge woods half-hexes to offer a little bit of cover. The Russian infantry sets up 1/3 of the way onboard - the central area of the play area has two small board edge woods that flank a large central grain field with an axial orchard road. In the Russian back area is another low (level 1) hill that pretty much covers the whole short axis of the board - the Russian Armour, entering from offboard will need to climb and traverse this before they can join their footslogging brethren. To win, the Russians must exit 17VP (3 of them infantry) off the westboard edge (hexrow I) after 5.5 turns.

What gives this scenario the ASL feel is the nature of the force: a small (5 squads) force of the classic 467 Landsers has to hold tight against a mass (10) of the comfortingly familiar Russian 447s. The leadership of the Germans is a 9-1 and a 7-0, whilst the Russians get an 8-0 and a 9-1. Support weapons are fairly similar - the Germans get the brutal MG42 HMG and two LMG, whilst the Russians have to lug a MMG and a couple of LMGs. In addition, the Russians receive a Lt Mtr, normally something we sniff at derisively, but vs open topped vehicles, actually something of a threat out to a range of 20 hexes - it is a concern. Finally the Germans get two Marders with the 75L gun , which is good but not outstanding in late 1942 though the ROF of 2 is very cool, whilst the Russians, get four KV1- E which is a nice-ish tank for this time period as it has 11 AF all around, a good MG platform and is equipped with Radios - it also has a straight 76 Gun, although it has only 11 (Red) movement factors. My basic TK for this scenario is 6 so I will be expecting some bouncing shells, though I do have the option of APCR which has a much healthier TK of 9. One drawback of the Marder is limited HE, so I will be doing a few 2 IFT AP shots at the marauding Russian infantry horde somewhere in this.

My defence is fairly simple - I stick the 9-1 and HMG on Level 1 of the single two level wooden building just in case the Russians feel like doing an amoeba creep through the big grain field, a 467/LMG goes in a board edge woods half hex to seal off the northern side of the board with a 467 reserve behind them as the mobile fire brigade. On the south side, I set up the remaining two squads in isolated buildings to assist the main HMG strongpoint. I keep one eye on the ability of the two LMGs to place across-the-board lateral firelanes through the grain field. Once I see which way Stephane is coming, I'll drop the HMG down to ground level to assist with firelanes where necessary. My only flaw in this is that there is no support if the HMG-manning squad go down - it is a key weapon and needs to fire all the time, but with only 5 squads... Finally, I get the Marders hulldown on the east ends of the two low level hills - they have a clear unobstructed view to the Russian level 1 entry area and will try to pick off at long range anything that wanders into their gunsights.

Stephane clearly doesn't want to do the amoeba creep through the central grainfield and so splits his force to do two board-edge shuffles using the cover of the edging woods. On the north side, his smaller flanking squad of the MMG, 8-0 and three 447s swiftly runs into trouble as they near the woods edge and they are unable to get anywhere for the entire game and on more than one occasion fail to recover the dropped MMG - my single overwatch 467 / LMG pretty much nullifies this threat from the start. Stephane's other plan to use the Mortar to harass my Mortars also goes awry as I manage to retain HE shots long enough to KIA the one squad there in Turn 1 Defensive Fire - similar to Tom's recent AAR of this game. This is a major plus for me as it takes out one of the threats to the Marders from the start. Finally Stephane's main infantry slowly crawls along the south edge whilst not doing a lot. The KV1-E's come on very cautiously trying to remain anonymous in the background as they struggle over the hill, but one gets whacked on an APCR shot as it tries to sneak across my LOS.

By Turn 3, things are going OK for me, but in two swift attacks big holes appear in the defence - first off my AL Marder rolls a twelve, and with the other one already being shot out, Stephane takes the opportunity to send the remaining 3 KVs to the south side to assist the main Infantry rumble. Then my 467 manning the HMG is broken then CRs to nothing on a box-car on a low attack...the essential MG is out of action. After a turn of dithering, I wake up to the fact that the 9-1 can still manage to shoot the HMG at half-effect and this is needed right now as there are 6 Russian squads, 2 x LMG and the 9-1 lined up in the woods edge just waiting to go. I try to dash the 7-0 back across the road to help with MG-manning duties but he ends up CR'ed and wounded to form the bastard step-child of ASL, a broken 3MF 5+2 leader! Way to go! In turn 4, Stephane risks the bog check successfully to send a KV1 through and adjacent to one of my (broken) 447 / LMG flank squads. Things are falling apart everywhere now as my other Marder is out of HE (but not APCR) and has 8 ROF shots in a row at a squad in a grainfield, but every 2FP HE- equivalent attack fails - yuk. Even though my broken squad is doomed to rout Stephane takes a Bounding Fire shot at them anyway - and of course it bites him hard when he rolls eyes and battle harden back to a 467. In the next turn I start up the working Marder, get it hull down on the next hill to the south, take the bounding fire shot and of course leave the stopped KV there a smoking charred ruin.

This is big - Stephane now has to get both of the surviving KV's off- board AND get at least 1-squad and a leader off the board as well. I still have four of my five squads functioning and then to cap it all, the other Marder repairs its gun. In Russian Turn 5, Stephane tries a series of slightly suicidal but no-other-choice infantry moves to get them in position for the T6 end-game rush exit strategy, but some accurate and lucky defensive fire and judicious use of Firelanes breaks most of them - I get two more lucky breaks when my dead-eye Marder takes out a third KV in German DF - he now has to get off the sole surviving Marder (not certain) and at least 10VP worth of infantry which is going to be really tough from here. Finally a low odds 6+2 shot breaks the 9-1 and 2x447 stack in the burning KV hex. These low crawl back one hex and if they can survive into T6 could miracle rally and still dash off to help the win, but through a CX move with one of my squads, I eliminate them with an FTR move and that was that.

So at last a win. Nothing great and there were one or two bone-head moves by me, but overall I had slightly better dice than Stephane, although in the mid-game it looked a bit grim. Stephane had many 2+2 shots against the CE Marder crew but they all failed and that became a problem for him. Stopping the northern flankers cold with just one squad was really cool and getting rid of the Mtr in Turn one was a major plus and keeping APCR was very useful, and I think Stephane missed an opportunity when the HMG went down as he should have risked a squad to charge that building and stop me getting that HMG back. I can't criticise him for taking the bounding shot on the Broken Infantry as we've all done that one, but their battle hardening and return really crimped the big infantry push in Turn 5. It was not a bad scenario though like all small scenarios it could be a little dicey if any of two of the three key German assets go down early in the game - the Russians really need to do a big combined arms push and concentrate on trying to get at least one of those Marders off the board with as much +2 vs CE crew fire as quickly as possible.

As always, welcome comments!

Nick

Wednesday, August 30, 2006

AAR: J106 - Marders not Martyrs

Tom Gillis

Well as some of you know I spent my Sunday playing ASL. Had a great time as usual too! Played two scenarios, both times as the Russians. Game one was Victor and I squaring off in "Marders not Martyrs" J106. This is a smallish, tourny sized 5.5 turner with defending Germans on bd V. Bd V is going to be in one of the starter kits I guess. It also comes in the new J7. Its a typical euro type bd with a few small lvl 1 hills and some buildings, woods and orchards, and lots of open ground. The German force has just 5 467s, 9-1, 7-0, an HMG, 2xLMGs, 8-1 ArLdr, and 2x(ROF2) Marders with 75Ls and only 1 for AF.

The Ivans have a decent force of 10x447s, 9-1, 8-0, MMG, 2xLMG, and a LtMtr at start. Both sides set up on bd, so no Boresighting for the defending Germans. On turn 1 the Russians get 4xKV tanks with red MPs of 11 and the standard early war 76 MA. Looking over the forces, both Vic and I thought the German force looked kind of brittle. OT AFVs vs. a LtMtr is always bad, and the Russians outnumber the krauts 2/1! Vic was a little nervous before the 1st die roll, looking at my huge force ready to pound him, but I never underestimate him, knowing he is a wily and effectice ASL'er.

I placed all my tanks to enter on the right hand side and spread the infantry pretty much in a line across the front row that I could start at. I (stupidly) placed my mortar in open hill terrain with opening shots on his back row Marders and placed the MMG with the 9-1 and a couple of squads in a building behind my start line. Vic placed most of his troops in some wooden buildings on my left hand side, with just a lone HS on my right behind some woods. Well I thought my Mtr with ROF 3 would start the game putting a hurt on the open topped AFVs. They had even managed to only get one hexside of HD in before game set up, (not that it would matter to indrect fire.) Note to players: Vic did not realize that LtMtrs do get to subtract from the IFT on the Indirect fire chart. So his Marders were not only -1 for being AF less than 4, but also -2 for open top. But it didn't matter...Not only did I not hit with said Mtr, I didn't get ROF. MMG shoots at Germans no effect. Movement phase, no major things, infantry moves into woods on either side of bd, and tanks move cautiously on behind orchards. Only effective DF is Vic shoots and gets a KIA on the manning Mtr squad with a 6-3. Ouch. Already lost the Mtr! No German prep/movement if I recall and no effective Russian DF. Turn 2: MMG shoots at Marders on lvl 1 hill, NE. Movement: I press the attack up the woods on each side but miss an LOS when I move the 8-0 and three squads thru another MMCs hex and overstack! Vic has a 4-1, shoots and of course they all break, with one of them elring to conscript. Good move! Not! Tanks try to move into sneaky firing positions but all I do is get one in ByP that Vic can see, but because of TCA restrictions I can't shoot back. Duh-ski! DF or his Prep see that tank go down, but luckily, the crew escapes. Moving along: there is little German manuveur as they are in good defensive terrain on lvl 1 hills, and wooden buildings. Some small infantry losses on the Russian side but by late turn three I still have three AFVs and 6 or 7 squads. The Marder ROF is murderous. Vic gets lots of ROFs, but I've been pretty lucky with a shocked tank coming back good, and lots of close calls. But suddenly in Turn 4 I lose another KV. My infantry is being broken and elr'd, I can't shoot back and things are looking grim. At one point Vic even suggested we start over as we'd been really playing fast. But this being ASL you never know what can happen. I say no lets play it out, its almost over. Well I get desparate. I really want to get one of those Marders. A 75L gun at this stage of the war is deadly. (Its late 1942.) I send one of my 2 remaining KVs right up to a Marder. Two hexes away so point blank. Vis had shot at him but missed. In AdF I need a three to hit. Not much chance I know.

But mid turn Vic's wife Melissa had brought me a cup of expresso. Now you guys who know me know I love coffee. I guess the energy of the expresso must have transferred into my dice because I roll and presto: a three! Next thing we have is a Marder wreck. Now I move the remaining KV. I really wanted to just get out of the LOS of the other Marder but its going to get at least one shot off before I can. Vic rolls and: boxcars! Vics cursed dice have caught up with him again. My infantry makes slow progress and advances closer to the exit row. His rally phase sees him roll to repair the Marder. If he rolls a 1 he's back in command. If he rolls 2 thru 5, he's hurt, but not out. If he rolls a 6 he's in big trouble. Well Vic rolls and its a 6! Disaster! Within 5 minutes he has gone from almost certain victory to very dire straights. I need 17 EVPs to win. But 3 of them have to be infantry. I'm close to the edge, Vic has no anti-infantry weapons left except CC or CCV. My tanks manuveur to make easy exits but leave their turrets pointed at the enemy. My infantry has to run a gauntlet of firelanes. I have a crew, the two ldrs and about three MMCs close to the exit line. One by one they try. The AFVs exit. There is the points right there except for the fact that three have to be infantry. The 8-0 easily makes it off as he had been able to get behind Vic before he pulled up the FL threat. The crew tries and Vic rolls low and it is eliminated. One of the squads tries and is pinned. Another squad tries the first FL and passes, goes thru the next FL and passes. Vic has to shoot his 9-1/HMG/467 guys. 8-3! He shoots and rolls a 5 or something. Russian Squad is pink mist _and_ Vic retains ROF on the Heavy! Last MMC tries and is broken! Yikes, its all down to the 9-1. With his modifier and his self he is worth exactly what I need in infantry to win. If Vic pins, breaks or KIAs him, thats it game over. Well first FL, he makes it, 2nd FL he makes it! Now Vic has to commit his last hope. HMG ldr directed 6-3. Remember in the early game this same bunch wiped out my Mtr squad on a 6 down three. What's it going to be? Vic rolls and its a '9.' So a 9 on the six column is a 1MC. Can Capt. Ivan pass it? Its been a wild game. At first it looked like a German slaughter. Then Ivan kicks back and luck helps put me back in it. End game Vic crawls back with good positioning of his remaining force. I roll. The dice clatter and land. Its a '5.' Capt Gillisov runs off, leaving his decimated but victorious company behind to join up with the 1st Sergeant and the remaining KVs!

Great game Vic. Neither of us ever gave up and it went down to the final roll. I do think this German force is brittle. If luck hadn't stole the MA from Vic's 2nd Marder it probably would have been a different outcome. We both said 7 (a recommend,) for ROAR. Thanks Vic!

Coming soon my AAR against Chris or Ivan II...

Tom